Feast Feature and Vector Serving at ScyllaDB Speed
A new and tighter integration between Feast and ScyllaDB online feature store, including vector search support and better performance Starting with Feast v0.65, you can build with a new and tighter integration between Feast and ScyllaDB online feature stores, including vector search support and better performance. This post covers what changed, what tends to push teams to outgrow their online… Source5 questions to ask before your next DataStax Enterprise renewal
Renewing a DataStax Enterprise (DSE) contract used to be a formality. Check the box. Sign the term. Get back to shipping.
That’s changed. IBM’s acquisition of DataStax didn’t touch your cluster. It touched the company on the other side of the contract. Your application runs the way it did last quarter, but the agreement you’re about to sign describes a different relationship than the one you signed a few years ago.
The decision is also bigger than renew or leave. You can renew DSE, move to IBM’s Hyper-Converged Database (HCD), or move to managed Apache Cassandra®.
A DataStax Enterprise renewal should be evaluated as a three-way decision: renew DSE, adopt IBM’s HCD, or migrate from DataStax to managed Apache Cassandra. The right choice depends on your support costs, DSE-specific dependencies, operational requirements, and tolerance for vendor lock-in. Five questions will help you choose.
1. What exactly are you renewing?IBM announced its acquisition of DataStax on February 25, 2025 and closed it on May 28, 2025. Since November 1, 2025, new DataStax transactions run on IBM contracts. IBM sells DSE and HCD as components of its watsonx.data Premium offering, not as a standalone Cassandra product line. DSE 6.x was withdrawn from market on October 31, 2025.
None of that means you’re cut off. IBM’s published lifecycle lists standard support through December 31, 2027, and extended support through December 31, 2031. Read the terms closely. Per IBM’s support policy, extended support is a separate purchased add-on, so include it when calculating your total DataStax Enterprise support cost.
Extended support covers critical bug and security fixes in the first year only. After that, you get usage support and existing fixes. Supported and current aren’t the same thing, so read your renewal for what it now describes: a different product relationship.
2. Where is IBM taking the Cassandra portfolio, and does it match your roadmap?IBM tells existing DSE customers they can keep running DSE for several more years and move to HCD “when ready.” HCD is moving, too. HCD 2.0 had its first public release in June 2026, rebased on Cassandra 5.0. IBM’s public DataStax materials now center on watsonx, vector search, and unstructured data for generative AI.
If you want an AI data platform with IBM as the vendor, that’s a coherent direction, and staying put can be the right call. If you adopted DataStax because your application needed Cassandra to run reliably at scale, with predictable latency and uptime your users never notice, ask whether the roadmaps match. They can overlap. They aren’t guaranteed to.
Already planning to move to HCD? Ask what problem it solves. HCD stays inside IBM’s platform, so the vendor dependency comes with you. It’s self-managed, so upgrades, incident response, and tuning stay with your team. It isn’t a like-for-like move, either: DSE’s integrated Search and Graph don’t come along. If you have to rework the architecture anyway, compare HCD with a fully managed, vendor-independent option before you commit.
3. Which DSE-specific features do you actually use?Your answer reshapes the decision more than any other question here. For some teams, Search, Graph, Spark integration, OpsCenter, and DSE Advanced Replication keep applications compliant, observable, and fast. Others pay for the bundle and use a fraction of it.
Leaving DSE doesn’t mean leaving an active project. Apache Cassandra is under active, independent development: versions 5.0.9, 4.1.12, and 4.0.21 all shipped on August 7, 2026. 5.0 is the Apache Software Foundation’s current generally available release line, and 6.0 is in development, with an alpha already published. If your application relies on core Cassandra plus enterprise-grade support rather than the DSE-specific layer on top, you want to know that before you renew.
Building on Astra’s AI tooling? Check what’s actually tied to Astra. Langflow is open source and vector-store agnostic, and its Cassandra integration works with open source Cassandra. The narrower boundary is RAGStack and Knowledge Graph RAG, which don’t port over. If you rely on DSE Graph, treat it as its own decision and scope it separately.
4. What does another contract term cost you in flexibility?Renewing isn’t automatically wrong. But every multiyear DataStax Enterprise renewal is also a multiyear commitment not to reevaluate, and that has a cost even when the sticker price doesn’t move. Vendor lock-in is a business issue as much as a technical one. An application that depends on predictable performance also depends on your team having room to negotiate, migrate, or scale on its own timeline. Before you sign, price the next 3 years from every angle: what it costs to stay, what it costs to move, and what you give up in leverage either way.
5. Do you know what leaving would cost, or are you estimating?Most teams renew DSE because nobody priced the alternative, not because they compared the options and chose to stay. Has your team calculated what it would take to migrate from DataStax to Cassandra, or is it renewing without a documented cost and dependency assessment?
NetApp® Instaclustr has migrated more than 10,000 DataStax nodes across dozens of customers to open source Cassandra. Tesouro reports a 75% reduction in its storage footprint after migrating. Pega reports roughly 60,000 Cassandra management hours saved a year, hours that now go to the application instead of the database layer underneath it. Clear Capital completed its migration with zero downtime. These outcomes are customer-reported, and results vary by workload.
Migration isn’t simple. DSE-specific features add real complexity, and that complexity has to be scoped. Experience is what makes it manageable: the path exists, teams have completed it at scale, and you can price it with real numbers. Learn how to migrate from DataStax to Cassandra.
Before you renew, price the exitYou don’t need a research project. You need someone who has done this before to look at your environment and tell you what staying costs, what leaving costs, and what you’d give up either way.
The DSE Exit and Renewal Assessment from NetApp Instaclustr does that. Fill out a short intake, then spend 30 to 45 minutes on a call with a migration engineer. You get a written summary of your DSE dependency, directional migration complexity, and a ballpark cost comparison. It’s free, with no obligation. If your answer is to renew or move to HCD, the assessment shows you that too. If the call turns up real complexity, the next step is a deeper scoping conversation for your account.
Book my free assessment today.
The post 5 questions to ask before your next DataStax Enterprise renewal appeared first on Instaclustr.
TimeSeries Tiered Storage Journey: Kafka/Flink Streams to Native Cassandra Cold Reads
By Oleksii Tkachuk, Rajiv Shringi, Chris Lohfink, Abe Ratnofsky, Kartik Sathyanarayanan
Introduction
In an earlier post, we introduced the TimeSeries Abstraction, our high-throughput, low-latency platform designed to store and query temporal event data at scale. It has since become the operational backbone for Netflix’s largest datasets, which now span multiple petabytes.
However, managing such large datasets in hot storage, tuned for low-millisecond latency access, is not cheap. At Netflix, cost-efficiency is a continuous discipline rather than a temporary initiative. This post shares two solutions that significantly reduce storage costs by continuously moving older, less frequently accessed data into cheaper object storage:
- Solution 1: Uses Apache Kafka and Flink to stream data directly to S3
- Solution 2: Leverages Cassandra backups in S3 and pluggable Memtables to read data directly from S3
We’ll start with the Kafka/Flink-based design, then describe how we evolved to a native Cassandra-based cold tier.
Challenges
As Netflix’s TimeSeries datasets have expanded, we’ve encountered several compounding challenges:
- Growing retention demands: Users often push for increasing data retention to serve a broader range of use cases, which in turn increases the storage costs.
- Escalating costs: Maintaining massive, dense clusters for infrequently accessed historical data is prohibitively expensive.
- Sparse historical access: Most queries target recent events, but older data must remain readily available for occasional audits and investigations.
- Operational strain: High storage density on hot nodes complicates scaling, deployment, and cluster stability.
- Latency requirements: Even historical data sometimes requires sub-second query performance for internal tooling and analysis.
This creates a clear opportunity: keep the most recent data on fast storage and migrate older, rarely read data to cheaper storage while preserving a consistent API. Done well, this can meet user and operational needs while greatly reducing our infrastructure spend.
TimeSeries Abstraction
Before we dive into the cold storage solutions, here is a quick recap of how TimeSeries partitions its dataset into multiple tables, each covering a window of time we call Time Slices.

This enables several key optimizations, most notably allowing a table to become immutable once it crosses the write boundary, which lets us safely apply further optimizations. For more details, refer to our previous post.
This slice information is critical and is maintained in a dedicated metadata table:

Creating new Time Slices and maintaining their metadata is a primary responsibility of the TimeSeries control plane. The TimeSeries data plane uses this information to correctly route the read and write traffic to the provisioned tables.

With that background, let’s look at the different solutions we built for data tiering.
Solution 1: Streaming with Apache Kafka and Flink
Our first solution followed a familiar streaming pattern using Apache Kafka and Flink, where we streamed data to S3 in realtime while simultaneously persisting it to Cassandra.

Getting Data Into S3 Efficiently
To optimize data streaming to S3, the system hash-partitions Time Series IDs into buckets. This partitions the stream and lets dedicated Flink tasks handle each bucket, ultimately batching and reducing the write throughput to S3. Flink workers batch events into Parquet files grouped by event time within the hour. These files are great for high-throughput streaming writes, but not for low-latency reads.
Enter the Compaction job.
Compaction Job to Optimize Reads
The compaction job runs daily and merges small Parquet files into a single, optimized daily Parquet file per namespace.
The job further optimizes the Parquet files in the following ways:
- Small Row Groups: Creates small (4–8 MB) row groups to minimize lookup cost. We can then use the Parquet Java library to perform range reads of row groups from S3. This is intentionally well below Parquet’s recommended row group floor — smaller groups were better because our reads are dominated by point/range lookups rather than full scans.
- Event Sorting: Sorts events within a row group by time, eliminating brute-force scans when querying for a time range.
- Bloom Filters: Caches Bloom filters and file metadata in EVCache, allowing the TimeSeries query planner to efficiently skip unnecessary reads from S3.

Once the compaction job completes, all compacted files per partition are recorded in the TimeSeries control plane, and the hot storage slices can now be truncated!
On some of our largest datasets, this job typically takes about 12 hours, prioritizing lower compute costs over execution speed.

Streaming Cold Tier Read
Once compacted files are optimized in cold storage, they are ready to be read. The TimeSeries data plane fans out a given query across both the hot and cold tiers and merges their result. The users still use the same query interface:

The Cold Tier Data Plane uses compaction metadata for aggressive planning and pruning, which dramatically reduces the S3 query fan-out. As a result, retrieving a full day of data requires at most three sequential S3 reads, even in the uncommon case where an ID spans two row groups. This yields a p50 latency of ~150 ms and a p99 latency of ~500 ms per read.

At the time of writing, the streaming cold tier implementation was processing up to 1,250 reads per second from cold storage globally:

Why not stop here?
The streaming cold tier has delivered real savings, shrinking both Cassandra’s EBS footprint and the Cassandra backup footprint in S3. But the streaming infrastructure itself is expensive and adds moving pieces that widen the team’s on-call scope:

We wanted to improve this further and asked ourselves:
- Can we avoid streaming data into the object store and the associated data transfer costs?
- Can we reduce the compute and operational overhead of new components?
That led to a more radical question: Can we read directly from existing Cassandra backups in S3?
Solution 2: Cassandra Cold Storage for Immutable Data
At Netflix, we back up Cassandra data into S3 at regular intervals for disaster recovery. The idea for tiering is simple:
Read directly from these S3 backups instead of paying a separate data transfer cost to S3.
Once TimeSeries marks a hot Time Slice as ready for cold storage, we can customize Cassandra to read directly from its backups, allowing us to delete the on-disk data copy. This would also incur minimal changes to the TimeSeries read path!

To make this viable in production, we had to answer a series of “How…?” questions.
How Can We Read the Backups Efficiently?
We introduced a new compaction strategy in Cassandra, which we call ReadOnlyCompactionStrategy (ROCS). Here is how it works:
Once a time slice crosses the user-configured cold-tier boundary, TimeSeries stops accepting writes for that time slice making it immutable. This immutability unlocks significant optimization opportunities:
- SSTable overlap: Standard strategies (LCS, TWCS) often produce SSTables that overlap in the token space, and so a single partition key may exist across multiple files.
- Read fan‑out: Because a read must touch every SSTable covering the key’s token range, this overlap turns a single point-read into multiple lookups, increasing latency across all tiers.
ROCS re-compacts all SSTables once, aligning them precisely with token ranges:

ROCS applies more broadly to all TimeSeries use cases, driving tail latency down on all storage tiers by reducing the SSTable fan-out during read operations:

Once the immutable Time Slices have been optimized, it is time to trigger backups.
How Would We Leverage Backups?
Cassandra backs up every node in the cluster, organizing each backup on S3 as a declarative manifest, along with the SSTables backing the keyspace’s tables:
 {bucket}/
  └── {prefix}/                             ← cluster identity (env_backup/hash_app)
      └── {token}/                          ← node identity (ring token)
          ├── META_V2/                      ← manifests, one per snapshot
          │   ├── {snapshotInstantMs}.json
          │   ├── {snapshotInstantMs}.json
          │   └── ...
          └── SST_V2/                       ← actual SSTable files
              └── {backupTimestamp}/        ← snapshot timestamp
                  └── {keyspace}/
                      └── {table-with-uuid}/
                          └── {compression}/
                              └── {encryption}/
                                  ├── {component-file}
                                  └── ...
The backup manifest orchestrates the backup, listing the paths to all its SSTables:
manifest.json
  ├── info
  │   ├── appName              "cass-cluster"
  │   ├── region               "us-east-1"
  │   ├── snapshotInstantMs    1748908800000
  │   ├── backupPathPrefix     "prod_backup/1234_cass/token"
  └── data[]
      └── [0]
          ├── keyspaceName     "ks"
          ├── columnfamily     "tbl-a1b2..."
          └── sstables[]
              └── [0]
                  └── components[]
                      ├── na-1-big-Data.db
                      ├── na-1-big-Index.db
                      ├── na-1-big-Filter.db
                      ├── na-1-big-Statistics.db
                      ├── na-1-big-Summary.db
                      ├── na-1-big-CompressionInfo.db
Alongside the large Data.db file, backups include a compact set of index, metadata, and integrity files. This structure allows us to quickly locate, validate, and restore specific partitions or data ranges without scanning the entire dataset. Furthermore, since the manifest catalogs every S3 path, we can download most of these components directly to the Cassandra node (excluding the Data.db file) where they occupy negligible space. These local components enable efficient query planning before any data is read from S3.
How Would Cassandra Read From Backups?
Cassandra reads typically pull data from two sources: the Memtable, which holds recent unflushed writes, and flushed SSTables on durable storage. As of Cassandra 4.1, we can leverage pluggable Memtables to redirect reads from “cold” tables directly to the backup storage in S3.
-- create table for a given Time Slice
CREATE TABLE data_20260616_00_04 (
    ...
    ...,
    PRIMARY KEY ((time_series_id, time_bucket, event_bucket), event_time, event_id, key)
) WITH CLUSTERING ORDER BY (event_time DESC, event_id DESC, key DESC)
    ...
    AND compaction = ...
    AND compression = ...
    AND memtable = 'backupmemtable:timestamp=1781953200000' ← Custom memtable
    ...
The timestamp marks the point at which the backup is guaranteed to cover the full table, and the table is guaranteed to be immutable.
Opening a backup Memtable kicks off a state-machine initialization that pulls the index data from S3 onto the node once:

This process ensures all SSTable components are downloaded reliably through several resilience mechanisms:
- Retries and backoff: All S3 operations and file-system cache writes use retries with exponential backoff.
- Resource isolation: Initialization runs on a dedicated thread pool, isolated from normal Cassandra operations.
- Partial download protection: If a downloaded component’s size doesn’t match the manifest, it is deleted and re-downloaded.
- DDL change protection: A .timestamp file marks completed initialization and ties it to the backup timestamp. If the table’s backup timestamp changes, this file is removed and initialization restarts for the new timestamp.
- Read protection: Memtable initialization is asynchronous; reads to an initializing memtable block for at most half the read RPC timeout.
Once initialization has pulled every SSTable component (except Data.db) from S3 onto the local disk, the Memtable is ready to serve reads. Here is what the read process looks like:

To minimize latency, the system parallelizes S3 reads across requests, SSTables, and individual chunks. A shared cache deduplicates fetches and prefetches data, so chunks are ready before they are needed.
We further optimize cluster and table settings to reduce the number of S3 calls:
- Larger compression chunks: Reduce S3 calls per partition by reading fewer, larger chunks (accepting some over-fetch on small reads).
- Read repair disabled: Avoid expensive, unnecessary repair traffic against immutable, pre‑repaired backup data.
- Speculative retries disabled: Prevent S3’s higher latency from triggering redundant, overlapping reads.
How Would We Know When It Is Safe To Read From Backups?
However, before the Memtable can point to a backup, we must confirm two things across the whole ring, and we use Cassandra Virtual Tables to do that.
First, that ROCS re-compaction succeeded:
cqlsh> SELECT * FROM netflix_views.cluster_view
       WHERE keyspace_name = 'system_views' AND table_name = 'sstable_tasks';

keyspace_name | table_name    | host     | value
--------------+---------------+----------+------------------------------------------------
system_views  | sstable_tasks | 10.0.0.1 | [{"table_name":"<.>","kind":"compaction", ...}]
system_views  | sstable_tasks | 10.0.0.2 | [] <---- no active compactions
system_views  | sstable_tasks | 10.0.0.3 | []
And second, that backups were fully captured (denoted by uploaded=True):
cqlsh> SELECT * FROM netflix_views.complete_backups
       WHERE keyspace_name = 'my_ks' AND table_name = 'my_table';

keyspace_name | table_name | timestamp     | num_tokens | num_uploaded | uploaded
--------------+------------+---------------+------------+--------------+----------
my_ks         | my_table   | 1765211400000 |          3 |            3 |     True
my_ks         | my_table   | 1765213200000 |          3 |            2 |    False
How Would We Automate This Entire Flow?
The TimeSeries control plane automates the entire transition as slices cross the immutable boundary:

Each slice can be in any lifecycle stage at any time without impacting system availability, and the system remains resilient to delayed backups or lagging compactions.
How Would Cassandra Handle The Additional Load?
Serving data from S3 is much more CPU-intensive than reading from local storage. A sudden spike in read requests can overwhelm the Cassandra cluster and affect the hot path, turning a cost-saving feature into a reliability risk.
To avoid this, cold reads can optionally run on a separate Cassandra cluster that points its backup Memtables at the hot cluster’s backups:

The cold Cassandra cluster must match the original cluster in topology but need not match it in hardware! We can run the cold cluster on much smaller, cheaper, storage-light instances.
Real World Performance
Cassandra Cold Tier was rolled out to the most storage‑intensive TimeSeries Abstraction clusters. It currently stores over 15 PB of compressed data in Cassandra cold storage and has allowed us to cut attached storage significantly on all affected clusters:

At the same time, it serves thousands of reads per second from cold tier storage in any given region:

Cassandra Cold Tier improves p90 latency by ~30% over the previous cold storage implementation, thanks to more efficient S3 access patterns and smaller read sizes, while keeping p99 latency under ~500 ms. Cassandra already handles bursts of cold reads gracefully via its chunk cache, so this design preserves that same resilience for the S3-backed cold tier:

Acknowledgements: Special thanks to our stunning colleagues who contributed to the TimeSeries Abstraction’s success and collaborated with us on the cold storage solutions: Kaidan Fullerton, Matt Lehman, Sumanth Pasupuleti, Carlos Matias Herrero, Nick Pavlakis, Bryan Keller, Francesco Di Chiara
TimeSeries Tiered Storage Journey: Kafka/Flink Streams to Native Cassandra Cold Reads was originally published in Netflix TechBlog on Medium, where people are continuing the conversation by highlighting and responding to this story.
Netflix Conductor: The Next Chapter
Netflix Conductor : The Next Chapter
by Aravindan Ramkumar on behalf of the Conductor team
Conductor is the workflow orchestration engine Netflix uses to stitch micro-services into reliable, observable business processes.
If you’ve followed Conductor from the outside, the last thing you heard was probably the note on its GitHub repository: Netflix discontinued maintenance of Conductor OSS to refocus its resources on the internal fork.
That announcement marked the end of the open-source chapter, and from the outside it may have looked like the end of the story. It wasn’t. Internally, Conductor never slowed down. If anything, it grew faster, and the demands of that growth pushed us to rebuild it from the ground up. This post is the answer to the natural question that announcement leaves open: what happened to Conductor after that?
A lot, it turns out. The clearest way to put it is in terms of growth. Not long ago, Conductor crossing a billion workflow executions in a single year felt like a milestone. Today it clears that bar roughly every quarter, and the monthly volume is still climbing. Sustaining that kind of growth meant rethinking nearly every layer of the system. The data plane it runs on was modernized piece by piece. The evaluation engine was rewritten. The way it allocates work, controls concurrency, and runs compute all changes. The through-line is simple: scale forced a rethink of the evaluation engine and the layers beneath it, and everything else followed.
The rest of this post walks through that evolution: how the architecture changed, the performance and scale work at the heart of it, the leap forward in developer experience, and the newer capabilities for controlling how workflows and tasks execute.
How Netflix uses Conductor
When we last wrote about Conductor, it ran a few hundred workflow definitions for a few dozen teams. That footprint has grown by orders of magnitude. Conductor now backs roughly 200,000 workflow definitions owned by around 150 applications, spanning Content and Studio Engineering, Ads, Games, and more. The runtime side has grown to match. In a typical month it executes on the order of 420 million workflows, and on a given day it runs anywhere from 5 to 20 million, with teams adding hundreds of new workflow types every month.
Conductor and the Media Production Suite
One of the clearest ways to see what Conductor does is Netflix’s Media Production Suite (MPS). It’s a set of applications that move production data into the cloud. An average Netflix title generates around 200 terabytes of original camera files, and MPS is what gets that media ingested, validated, transcoded, and delivered to the right people around the world.
The multi-step pipelines behind MPS’s workflows (Footage Ingest, Dailies, VFX Pulls, and Conform Pulls) run as Conductor workflows. A dedicated orchestration layer called Studio Orchestrator stitches together the platform services these pipelines depend on, such as asset management, media encoding, and storage, using Conductor under the hood to ensure reliable execution and the durability to recover from the inevitable failures of long-running, distributed work.
Beyond the studio: Ads and Games
Content engineering is where Conductor started, but it’s no longer the whole story. Two of Netflix’s newer businesses lean on it just as heavily.
Netflix Ads has made Conductor a backbone of its programmatic pipelines. Creative ingestion, advertiser-certificate management, and privacy-preserving Data Clean Rooms all run as Conductor workflows.
Netflix Games uses Conductor to orchestrate the path a game takes from a partner’s submission to the app stores. When a studio uploads a build, a Conductor pipeline ingests the binary, runs the required validations (for example, iOS privacy-manifest checks), and drives App Store publishing, coordinating steps that span multiple platform services and external stores with the same reliability and visibility the studio pipelines rely on.
How the architecture evolved
Our earlier post described a Conductor built on a particular set of building blocks: DynoQueues for queueing, Dynomite for metadata, Cassandra (partially) for execution data, and Elasticsearch for indexing. That stack carried Conductor a long way, but as adoption climbed, almost every layer of it was eventually rethought. The data plane Conductor runs on today looks very little like the earlier one.
1.0: the original stack, and where it strained
In its first generation, Conductor leaned heavily on Dynomite (with DynoQueues as the queueing recipe layered on top) backed by Elasticsearch for indexing. It worked, but two classes of problems showed up as scale grew. The first was the datastore. Dynomite is an in-memory store: a clustering layer that adds sharding and replication on top of Redis. You scale it by adding memory and nodes, with each replica rack holding a full copy of the data, which suits a cache but not the durable record for millions of workflows a day. Dyno Queues, built on the same store, inherited those limits, and its zone-sharded design made task scheduling uneven. The second was the engine’s design: evaluation ran synchronously and mutated workflow state in several places, so competing updates could leave a workflow inconsistent with no automated way to repair it.
The 2.x line was a sustained campaign to address these, and two replacements did most of the heavy lifting.
2.0: Cassandra as the backbone
The most consequential change was making Cassandra the primary datastore for execution data, displacing Dynomite. Cassandra gave Conductor the elastic, horizontal scaling it needed, and removed the scaling ceiling and zone-affinity constraints that the old datastore imposed. Around the same time, large task inputs and outputs were offloaded to S3, keeping bulky data off the primary datastore and further easing the pressure on it.
Timestone: a purpose-built queueing layer
The second replacement was the queue itself. Timestone, Netflix’s high-throughput, low-latency priority queueing system, took over from DynoQueues. Beyond shedding the Dynomite dependency, it brought two capabilities that mattered for reliability: a delayed-queuing mechanism, and a background repair process that could detect and recover workflows. Timestone also turned out to be foundational for work that came later. The async evaluation queue and the queue-depth-driven dynamic thread allocation described later in this post both build on it.
Alongside these, the 2.x series also decoupled indexing from the critical path, moving to a Kafka-buffered, independently scalable indexer writing to Elasticsearch.
3.0: consolidating the modern data plane
By Conductor 3.0, these threads came together into a coherent platform. Dynomite was fully sunset. Timestone was the queue and Cassandra the datastore. A Kafka-fed indexer pushed to Elasticsearch, with Iceberg added for long-term storage. The release also shipped automated workflow repair and multi-cluster deployment, the last of which lets workflows run in fully isolated contexts (for example, a dedicated context for the Media Production Suite, kept separate from the shared default and scaled on its own).
The net effect is that by 3.0 the foundational reliability and scaling problems of the early era were largely solved, and the data plane reached roughly the shape it has today.

Rebuilding the engine: Conductor 4.0
By 3.0, everything around the evaluation engine had been modernized, but the engine and its data model were largely the original, and at this scale that became the bottleneck. The engine evaluated a workflow by loading its entire state into memory to decide what to do next, which meant heavy memory pressure and slow evaluations as workflows grew toward tens of thousands of tasks. It also stored a workflow’s metadata and its task payloads in the same Cassandra partition, producing oversized “wide rows” and leaving room for race conditions when several updates to the same task competed. Evaluation overhead, vertical-scaling pressure, and occasional inconsistent state needed to be addressed.
A partitioned task model
The old data model co-located everything about a workflow in one place. The rewrite separates workflow metadata from task and user data and gives each task its own record. The engine no longer loads the whole workflow graph to make a decision. It evaluates against a lightweight blueprint of the workflow and loads only the specific task data a decision needs. The practical result is a dramatically smaller memory footprint per evaluation and far less work to advance a workflow by one step.
The 3.0 engine topped out around 2,500 tasks per workflow. The rewritten engine scales to 30,000 tasks per workflow, more than a 10x increase. Evaluation got faster too: in production, the rewrite delivered roughly a 40% reduction in p99 workflow-evaluation latency.

Making competing updates safe using partitions
Separating the data is only half the story. The engine also has to make competing updates to the same task safe, because a task can be written from more than one place at once. Picture a long-running task whose worker sends periodic updates to keep it alive, each one marking the task in-progress, before finally reporting it COMPLETED. If a stray in-progress update arrives just after that completion, reordered by the network, it could quietly revert a COMPLETED task back to IN_PROGRESS.
The first version leaned on Cassandra lightweight transactions (LWT) to serialize these writes, but mixing LWT with ordinary writes is a known Cassandra anti-pattern. The two use different timestamping mechanisms, and combining them breaks the strict consistency Conductor needs.
So the data model evolved away from locking entirely. Task state is split across two partitions: a pending partition for tasks still in flight, and a terminal partition that a task is written to exactly once, when it reaches a terminal state (COMPLETED, FAILED, etc). When the engine evaluates a workflow, it reads both and reconciles them in the application layer with one simple rule: a terminal state always wins over a non-terminal one, and between two writes of the same kind (two in-progress, or two terminal) ordinary last-write-wins applies. So in the race above, when the task is marked COMPLETED it lands in the terminal partition, and the late in-progress update loses on read.

The net of the rewrite is reliable task lifecycle management, a lower memory footprint, faster evaluation, and far higher concurrent throughput.

Removing the last synchronous bottleneck: async workflow evaluation
A faster engine still left one structural problem. Workflow evaluation ran synchronously. When an update arrived, a new workflow or a task completing, the request itself evaluated the workflow, and to do that safely it had to take a lock on that workflow. Under load, concurrent updates to the same workflow raced for that lock. Only one won, and the rest were deferred to a background repair process that, in extreme cases, could take several minutes to catch up. The result was exactly the kind of unpredictable tail latency that hurts most under peak load.
The fix was to decouple the trigger from the evaluation. Updates no longer evaluate inline. Instead they enqueue the workflow onto a Timestone exclusive queue, and a central asynchronous evaluator processes each workflow’s pending work in order. Because the queue is exclusive, only one worker ever evaluates a given workflow at a time, so the lock contention simply goes away.
The results are most dramatic at the tail (p99 and p99.9), which is the point, since the tail is what users feel under load:

Unsuccessful lock-acquire attempts, which had spiked to around 2,700 per interval under contention, drop to essentially zero with async evaluation.

Controlling how workflows execute
Run Strategies: native control over workflow concurrency
For most of its life, Conductor would happily run as many instances of a workflow as you started, all at once. That’s the right default, but it left a gap. When several workflow instances act on the same entity, the same movie id, the same creative, the same script, there is no built-in way to serialize them or guarantee only one runs at a time. Teams that needed this had to build it themselves: custom locks, custom queues, custom coordination logic bolted onto their workflows. That’s extra complexity in every workflow that needs it, and a real source of operational risk.
Run Strategies are a way to declare, on a workflow definition, how concurrent executions should be handled. There are two strategies today. Parallel, the default, applies no restrictions and behaves exactly as workflows always have. Sequential runs at most one workflow at a time per sequence key, with subsequent requests enqueued and started automatically, in order, as each running workflow finishes. A run strategy is declared on the workflow definition, and can be set directly in the Workflow SDK as a @RunStrategy annotation argument on the @WorkflowMethod.
The key idea is the sequence key: two executions that share a sequence key run one after another, and executions with different keys still run in parallel. So a content-ingestion workflow keyed on movie id processes each title strictly serially while happily running many different titles concurrently, with no custom locking required.
Beyond polled workers: managed, serverless tasks
A task meant a polled worker: your application implements the worker, polls the Conductor server for work, runs it, and reports the result back. That model is simple and language-agnostic, and it’s still the backbone for most workloads. But it has a cost. You operate the worker fleet. You stand it up, keep it running, and scale it, even for work that’s bursty or runs rarely.
So Conductor added managed tasks: built-in task types where Conductor drives the compute directly, with no long-lived worker for you to host or scale. Two integrations carry most of this today: Titus for containers and Stratum for serverless media-processing functions.
A TITUS task launches a Titus job to run a script, whether shell, Python, or whatever your image packages, using Titus, Netflix’s container management platform, as the compute plane. You point the task at a Docker image and an entry point, and specify the shape of the run, such as cpu and memory. The lifecycle is fully managed. The task starts IN_PROGRESS, Conductor monitors the Titus job, and it transitions on the container’s exit behavior. An exit code of 0 marks the task COMPLETED, and a non-zero code, a timeout, or a missing job marks it FAILED. The upshot is that you can spin up containerized compute as a step in a workflow without running a worker that sits around polling.
A STRATUM task invokes a Stratum function and collects its output. Stratum is the serverless function layer of Netflix’s Cosmos platform, purpose-built for media-processing workloads, and a Conductor STRATUM task is the natural way to call one from a workflow. You give it a function name and an ordered list of arguments. The task stays IN_PROGRESS until the function finishes, then resolves to COMPLETED, FAILED, or TIMED_OUT. Because Stratum exposes functions to Conductor directly, teams can fold resource-intensive media operations into a workflow without owning the compute that runs them.
Polled workers, Titus jobs, and Stratum functions are three points on a spectrum, and a single workflow can mix all three: a long-lived worker for steady high-volume work, a Titus container for an occasional heavy batch step, and a Stratum function for media processing. Managed tasks shift the operational burden from the team to the platform.
Scaling task polling: dynamic thread allocation
The engine work in the previous section made Conductor evaluate workflows fast. But there’s a second half to throughput: how quickly workers pick up the tasks that evaluation schedules. That’s a polling problem, and at scale it has its own failure mode, one that showed up most sharply for Studio Orchestrator, the heavy Conductor user behind the Media Production Suite pipelines from earlier in this post.
Conductor clients poll for work using worker threads, and historically the number of threads was fixed per task type. That’s predictable, and it prevents any one task from starving the others, but it’s static. During burst traffic, when thousands of instances of a single task suddenly pile into a queue, a fixed thread count can’t ramp up to drain them. The symptom was distinctive: CPU on the instances stayed flat while queues backed up, and idle threads sat stranded on quiet queues unable to help the overloaded one.
Allocating threads by real-time queue depth
The fix is a dynamic allocation strategy that rebalances threads across task queues continuously, based on how much work each queue actually has, while still guaranteeing every queue a floor so nothing starves.
Each instance periodically polls Timestone for the current depth of every task queue it manages. It then splits its thread pool into two parts. A minimum allocation gives every queue a baseline number of threads, so no queue is ever fully starved. A floating pool holds the remaining threads, distributed across queues in proportion to each queue’s share of the total load. A queue with a deep backlog draws a large slice of the floating pool. An idle queue falls back toward its minimum, freeing threads for whoever needs them.
One guardrail keeps this from becoming its own problem: a multiplier ceiling. A queue’s thread count can grow by at most a configurable factor per cycle, so even a dramatic load spike ramps up in controlled steps rather than all at once, giving downstream and dependent services time to absorb the increase instead of being bombarded. Allocations are recomputed every polling interval, so the system tracks shifting load in near real time while always honoring the per-queue minimums.
Two things come out of this. First, because threads are allocated where they’re actually needed, each instance can safely run a much larger pool. Second, CPU utilization becomes an accurate signal of how busy an instance is, which means autoscaling on CPU makes the cluster scale out in response to real computational demand.
Developer experience: Workflow SDK
For most of Conductor’s life, authoring a workflow meant writing JSON. You declared each task, then wired one task’s output into the next with ${taskRef.output.field} string templates, and on the worker side you pulled inputs back out of a Map<String, Object> and cast them to the types you expected. It worked, but it pushed an entire class of errors to runtime, and made large workflows genuinely hard to read.
The Workflow SDK is our answer: a type-safe Java DSL for authoring Conductor workflows. You write Java code. The compiler and IDE catch mistakes before anything deploys, and a Gradle plugin translates your Java code into the JSON workflow definition the Conductor server understands.
Crucially, the SDK gives you the best of both worlds. One of Conductor’s defining strengths has always been visibility. Because a workflow is a declared graph rather than imperative code, during execution the exact control flow can be inspected, every branch, loop, and parallel fork, and light up live as an execution moves through it. Writing workflows in imperative code gives you none of that. A timeline is not a workflow diagram. The SDK keeps both halves. You write in idiomatic Java and at execution time you still get the full visual graph: the same task-by-task flow, inputs and outputs, and at-a-glance “where is this stuck and why” that Conductor has always offered.
The authoring pains it removes
No type safety. In the JSON model, a task input like “movieId”: “${awesomeTask2.output.movieId}” is just a string template. The worker reads it back with inputData.get(“movieId”) and casts. If the upstream value is actually an Integer and you cast to String, you get a ClassCastException at runtime. Fix that, and a subtle typo bites next: the JSON declares an input variable movieId but the worker reads inputData.get(movieid), which returns null and you get a NullPointerException downstream. None of this is visible until the workflow runs.
public class GetMovieWorker implements Worker {
  @Override
  public TaskResult execute(Task task) {
    Map<String, Object> inputData = task.getInputData();
    long movieId = (Integer) inputData.get("movieId"); // cast, fingers crossed
    // more logic here
  }
}
Verbosity. Defining a couple of tasks is already wordy. A real workflow’s JSON balloons into hundreds of lines that are difficult to review or refactor. A complex branching workflow becomes a single large JSON blob that no one wants to touch.
{
 "name": "wrap_movie_workflow",
 "version": 1,
 "semver": "0.0.1",
 "schemaVersion": 2,
 "restartable": true,
 "workflowStatusListenerEnabled": false,
 "ownerEmail": "team@netflix.com",
 "timeoutPolicy": "ALERT_ONLY",
 "timeoutSeconds": 0,
 "tasks": [
   {
     "name": "get_movie",
     "taskReferenceName": "movie",
     "type": "SIMPLE",
     "inputParameters": {
       "movieId": "${workflow.input.movieId}"
     }
   },
   {
     "name": "wrap_movie",
     "taskReferenceName": "wrapMovie",
     "type": "SIMPLE",
     "inputParameters": {
       "movie": "${movie.output}"
     }
   }
 ]
}

How the Java DSL works
@TaskMethod
public Movie getMovie(long movieId) { /* real worker logic */ }

@TaskMethod
public WrappedMovie wrapMovie(Movie movie) { /* real worker logic */ }
@WorkflowStub(taskNames = {"movieapp.getMovie", "movieapp.wrapMovie"})
public interface MovieWorkflows {
  @WorkflowGenerated(name = "movieapp.getMovie")
  Movie getMovie(int movieId);

  @WorkflowGenerated(name = "movieapp.wrapMovie")
  WrappedMovie wrapMovie(Movie movie);

  @WorkflowMethod(name = "wrap_movie_workflow", ownerEmail = "team@netflix.com")
  default WrappedMovie wrapMovieWorkflow(MovieInput input) {
    Movie movie = getMovie(input.getMovieId());  // long in, Movie out (checked)
    return wrapMovie(movie);                     // Movie in, WrappedMovie out (checked)
  }
}
The DSL has two core building blocks. The first, @TaskMethod, is a method that is executed at runtime and can contain arbitrary code. Crucially, it takes and returns real types: a getMovie task can take a long movieId and return a Movie object directly, with no maps and no casts. The second, @WorkflowMethod, is a method that is not executed and cannot contain arbitrary code. It expresses the workflow as ordinary method calls (call getMovie(…), then pass the result to wrapMovie(…)), and a Gradle build plugin parses it into a Conductor JSON definition at build time. The server does not see the Java code. It gets the same JSON it always has.
Code generation is central to how this works. In the @WorkflowStub annotation you declare the task and workflow names you want to use, and at build time the Gradle plugin generates their input and output types along with typed stub methods that you call inside a @WorkflowMethod. Those generated stubs are what let the method body compile against real signatures with full type safety. Because the stubs are generated from names rather than shared code, teams can reuse each other’s tasks and workflows without sharing libraries.
Real control flow, expressed in Java
The examples above are linear, but most production workflows branch, loop, and fan out. The DSL expresses these as the Java constructs you’d reach for anyway, and the SDK parses them into the corresponding Conductor operators. A useful mental model: you’re describing a workflow graph in Java, not running Java, so the parser only supports the constructs that map cleanly to Conductor (if/else, switch, do-while, parallel forks, sub-workflow calls) and asks you to express a few things its way. Iteration, for instance, is always a do-while, since there are no for or while tasks in Conductor.
A common shape is to kick off work, poll until it settles, then branch on the outcome, which is a do-while loop wrapped around an if/else:
@WorkflowMethod(name = "process_asset_workflow", ownerEmail = "team@netflix.com")
default void processAssetWorkflow(AssetInput input) {
  JobStatus status = submitJob(input);

  do {                                        // loops are do-while
    status = checkStatus(input.getJobId());
  } while (status.getState() == "PENDING");

  if (status.getState() == "SUCCEEDED") {     // branch on the result
    publish(input);
  } else {
    flagForReview(input);
  }
}
Independent work runs concurrently with ParallelExecution.fork(…) plus allOf(…) (a FORK and JOIN), and any other @WorkflowMethod can be called as a sub-workflow just by listing it in workflowNames:
@WorkflowStub(
    taskNames = {"movieapp.getMovie", "movieapp.enrichMovie", "movieapp.getArtwork",
                 "movieapp.refreshCache", "movieapp.publishPage"},
    workflowNames = {"movieapp.localize_page_workflow"})
public interface MoviePageWorkflows {
  // stubs not shown for brevity
  @WorkflowMethod(name = "prepare_movie_page", ownerEmail = "team@netflix.com")
  default void prepareMoviePage(MoviePageInput input) {
    // three independent branches, run in parallel
    Fork<WrappedMovie> details = ParallelExecution.fork(() -> {
      Movie movie = getMovie(input.getMovieId());
      return enrichMovie(movie);
    });
    Fork<Artwork> art = ParallelExecution.fork(() -> getArtwork(input.getMovieId()));
    Fork<Void> cache = ParallelExecution.fork(this::refreshCache);

    ParallelExecution.allOf(details, art, cache);   // FORK_JOIN and JOIN

    WrappedMovie enriched = details.get();
    Artwork artwork = art.get();
    LocalizedPage localized = localizePageWorkflow(input);  // sub-workflow call

    publishPage(enriched, artwork, localized);
  }
}
Sharing tasks and workflows across applications
Teams shouldn’t re-implement common tasks. Listing another team’s task or workflow in your @WorkflowStub is enough to call it like a local method, or invoke it as a sub-workflow, and the shared POJO types (a Movie, say) come along directly, with no copy-pasting between codebases.
Feature parity and rapid adoption
The SDK is gaining rapid adoption and has become the primary choice for authoring new workflows at Netflix. We continue to invest in the developer experience, with intelligent IDE plugins, better debugging, and an integrated testing framework so that testing a workflow in code feels like testing any other code.
In production: Netflix Ads
Netflix Ads runs complex, multi-step processes on Conductor with the Workflow SDK, and three examples show the range. Creative ingestion is a heavily branching pipeline where the SDK turned a sprawling JSON blob into type-safe, testable code, and a sequential run strategy eliminated a duplicate-processing race by serializing work per creative. Advertiser certificate management automates a previously manual, hard-to-scale process across several system integrations, with downstream automation when certificates expire. And Data Clean Rooms are privacy-preserving environments where Netflix and a partner run joint analysis on shared data, built on the SDK from day one. Provisioning a clean room is a multi-day sequence (create at a vendor, wait for the partner to join, activate, and eventually archive) that previously relied on hand-rolled async polling. Re-authored as Conductor workflows, each phase became a durable, observable state machine with automatic retries, state that survives restarts, and long partner waits that yield rather than hold a thread.
The common thread is that the SDK made multi-process, multi-integration workflows easy to author and maintain, and let teams lean on Conductor’s reliability and visibility instead of hand-rolling retries and distributed locking.
What’s next
Like the last time we wrote about Conductor, the road ahead is less a fixed roadmap than a wish-list, a sense of where we’re headed, shaped by what teams keep asking for.
On scale, the demands keep growing. As Netflix expands into new content types, like live, games, and podcasts, we anticipate our workflow load could grow 5x in the coming year, and the engine work described above is what gives us confidence we can absorb it without re-architecting again.
On developer experience, the Workflow SDK now covers all task types, so the focus shifts to the experience around writing workflows: a richer integrated testing story so a workflow can be validated against real worker behavior as easily as any other code, deeper agent tooling such as skills, plugins, and MCPs, and safe schema evolution: a schema registry for shared tasks and workflows, with guardrails that block non-backward-compatible changes so they can evolve without breaking the teams that depend on it.
On execution control, sequential is only the first run strategy. A family of richer policies is on the roadmap, including running N at a time per key, idempotent de-duplication, keep-first and keep-latest, and combinations of these, to cover the coordination patterns teams currently hand-build. And managed tasks will keep expanding the ways Conductor can run compute directly, beyond today’s container and serverless function integrations.
None of this is exhaustive, and priorities shift with the workloads we take on. But the direction is consistent: keep the overhead low, keep authoring safe and simple, and keep widening the range of work a single workflow can reliably coordinate.
Acknowledgments
Netflix Conductor is built and operated by the Enterprise Workflow Platform team, with contributions from many partner teams across the company.
Andrew Seier, Anoop Panicker, Christian Johnson, Christine Yu, Jasmine Lee, Jiaofen Xu, Michael Torku, Peter Lau, Prashant Rastogi, Ryan Kastilani Surafel Korse and Victor Lee have contributed to Conductor. We thank Charles Zhao, Sumukh Shivaprakash and the teams in the Content and Business Products and Ads organizations for their guidance and constructive feedback while developing and operating Conductor.
Netflix Conductor: The Next Chapter was originally published in Netflix TechBlog on Medium, where people are continuing the conversation by highlighting and responding to this story.
Inside the Database Internals Talks at P99 CONF 2026
Since database performance is so near and dear to ScyllaDB, we reached out to our friends across the community to ensure that a nice range of distributed data systems, approaches, and challenges would be represented at P99 CONF 2026. As you can see from our agenda, the response was overwhelming. Join us at P99 CONF (free + virtual) A quick PSA for the uninitiated: P99 CONF is a free 2-day… SourceBuilding a Faster (Rust-Based) Python Driver for ScyllaDB
Binding Rust to Python with PyO3, zero-copy deserialization with yoke Since Python is one of the most commonly used languages for interacting with a database, having a robust ScyllaDB Python driver is essential. The first ScyllaDB Python driver was created ages ago, back when ScyllaDB was in the 2.x stage, and it’s been used ever since. As part of the ZPP Project at the University of Warsaw… SourceMCP Gateway RBAC tutorial: Add Role-Based Access Control to your AI agent with Auth0 and Apache Cassandra
This is a follow-up to “MCP Gateway tutorial: Connect an AI Agent to Apache Kafka and HTTP Server Backends,” extends the original support chatbot with Auth0-based login, role-based access control (RBAC), and an Apache Cassandra backend.
In this MCP Gateway RBAC tutorial, you will configure MCP Gateway to enforce role-based access control for an AI agent. The walkthrough adds Auth0 authentication, maps user roles to MCP Gateway Access Control Lists, connects an Apache Cassandra backend, and shows how each persona receives only the tools their role is allowed to use.
The goal is to support least-privilege access for AI agent tools at the gateway layer: Auth0 authenticates the user, MCP Gateway maps the user’s role to an Access Control List, and the agent receives only the tools that role is permitted to call.
Get the code: MCP-Gateway/shoe-store-support-chatbot-rbac
Watch the tutorial: Add RBAC to Your AI Agent: MCP Gateway + Auth0 + Apache Cassandra
Recap: where we left offThe previous article built a support chatbot for a shoe
e-commerce company, backed by one MCP (Model Context Protocol)
Gateway Virtual Server (supportchatbot) with two
backends: ordersapi (HTTP) providing get_orders, and
supporttickets (Apache Kafka) providing
submit_request. That version had a single, shared set
of tools for every user.
This article adds Auth0 login and three distinct roles
(support-agent, merchandiser, and
readonly-auditor), plus a third backend type,
Cassandra, so each persona gets exactly the access their job calls
for, configured entirely at the MCP Gateway.
From the previous tutorial, you should already have:
- An MCP Gateway Virtual Server
(
supportchatbot). - The ordersapi (HTTP) backend with a
get_orderstool. - The supporttickets (Kafka) backend with a
submit_requesttool.
Everything involving Auth0, OAuth, roles, and Access Control Lists (ACLs) is new in this article.
Tooling: Python 3.11+, the uv package manager, and an AWS account with Amazon Bedrock model access enabled for the model you’re using, in the region you’re calling (e.g. us-east-1).
The use case: a product catalog with tiered cost visibility-
support-agent(customer-facing staff) gets product info (name, price, stock) to help shoppers, plus order lookups and ticket filing. -
merchandiser(buying/purchasing staff) gets supplier cost and margin data to negotiate pricing, commercially sensitive information relevant to their role, distinct from customer-service tooling. readonly-auditorgets full read visibility across both domains for review purposes, with action (filing a ticket) reserved for support-agent.
Role-Based Access Control means a user’s identity maps to a fixed role, and every access decision is checked against an explicit allow-list. In MCP Gateway, that role determines which tools an AI agent can discover and call, so each persona gets exactly the access their job requires: no more and no less.
This matters especially for an LLM-backed agent, for three reasons:
- It keeps every session’s capabilities predictable, no matter
how the conversation goes. The chatbot handles free-text customer
input, and however that conversation unfolds, a support-agent
session simply can’t reach
catalogdata_get_supplier_cost: it’s not part of that role’s tool set, so there’s nothing to accidentally or deliberately reach for. The boundary is a property of the session, not a judgment call the model has to get right in the moment. - It lets you express two independent things: what a role can
see, and what it can do. merchandiser can see cost data but can’t
file tickets;
readonly-auditorcan see everything but can’t act on any of it. Splitting visibility from action this way maps naturally onto how organizations already assign responsibility. - It moves enforcement to a layer that’s easy to reason about. Rather than relying on prompt instructions like “don’t answer cost questions for this role,” which work well in the common case but depend on the model’s judgment every time, the MCP Gateway checks the ACL before a tool call is honored, giving you one clear, auditable place where access is decided.
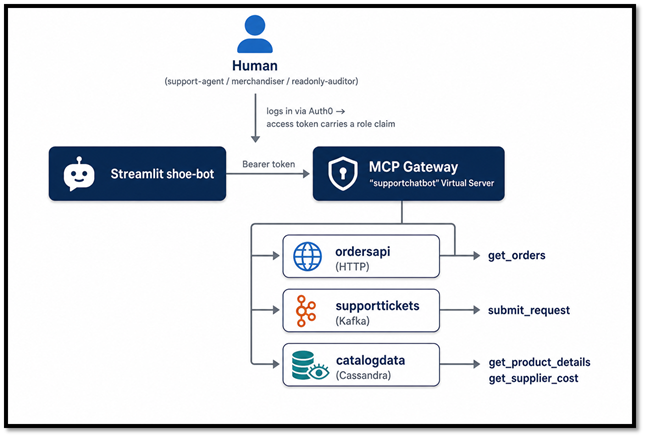
Figure 1. Routing role-based AI agent requests to HTTP, Kafka, and Cassandra backends through the MCP Gateway
Step 1: Provision the Cassandra clusterIn the Instaclustr console, Create Cluster → Apache Cassandra, choosing a data center/region and node size appropriate for a demo.
Once the cluster reaches Running, note its Data Center ID from the Details page for Step 3.
Use the console’s Connection Info tab and default superuser credentials to connect via cqlsh for the next step.
Step 2: Set up the Cassandra schema, seed data, and a least-privilege roleCREATE KEYSPACE IF NOT EXISTS catalog WITH replication = {'class': 'SimpleStrategy', 'replication_factor': 3}; CREATE TABLE catalog.products ( productid text PRIMARY KEY, name text, description text, category text, listprice decimal, stockstatus text ); CREATE TABLE catalog.supplier_costs ( productid text PRIMARY KEY, supplierid text, unitcost decimal, marginpercent decimal, suppliercontact text ); CREATE ROLE mcpgateway_catalog WITH PASSWORD = '<password>' AND LOGIN = true; GRANT SELECT ON catalog.products TO mcpgateway_catalog; GRANT SELECT ON catalog.supplier_costs TO mcpgateway_catalog; INSERT INTO catalog.products (productid, name, description, category, listprice, stockstatus) VALUES ('SHOE-001', 'Midnight Runner', 'Black low-top running shoe', 'running', 129.99, 'in_stock'); INSERT INTO catalog.products (productid, name, description, category, listprice, stockstatus) VALUES ('SHOE-002', 'Trailblazer Boot', 'Brown waterproof hiking boot', 'hiking', 189.99, 'backordered'); INSERT INTO catalog.supplier_costs (productid, supplierid, unitcost, marginpercent, suppliercontact) VALUES ('SHOE-001', 'SUP-88', 42.00, 67.7, 'orders@northstarfootwear.com'); INSERT INTO catalog.supplier_costs (productid, supplierid, unitcost, marginpercent, suppliercontact) VALUES ('SHOE-002', 'SUP-14', 71.50, 62.4, 'sales@trailgearco.com');
Connect with the credentials and endpoint from your cluster’s
Connection Info tab before running this (see Step 1).
mcpgateway_catalog is read-only and scoped to just
these two tables: a second, defense-in-depth layer of access
control underneath the MCP Gateway’s own ACLs.
Notes:
- Identifiers are written lowercase throughout, matching how Cassandra represents unquoted identifiers internally: table/column names and named bind markers alike. Writing them lowercase from the start keeps the CQL here consistent with the tool configuration in Step 3.
- Remember to replace <password> in the
CREATE ROLE mcpgateway_catalogstatement with a real, strong password before running this; it’s a placeholder, not a literal value. Keep it somewhere secure, since you’ll need to re-enter it in Step 3 when you create thecatalogdatabackend on the MCP Gateway (that’s where these credentials actually get used).
On the supportchatbot MCP Virtual Server → Create
Backend → name catalogdata, type Cassandra, using the
Data Center ID from Step 1 and the mcpgateway_catalog
credentials from Step 2.
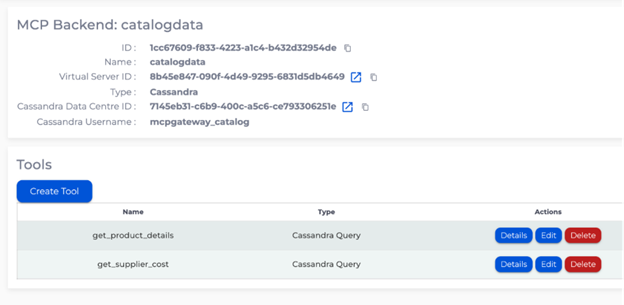
Figure 2. The catalogdata Cassandra backend,
showing its Cassandra Data Center ID, Cassandra Username
(mcpgateway_catalog), and its two configured
tools.
Open the new catalogdata backend and, under Tools,
click Create Tool to create the below two tools.
get_product_details:
SELECT name, description, category, listprice, stockstatus FROM catalog.products WHERE productid = :productid
- Parameter:
productid(string) - Result fields:
name(string),description(string),category(string),listprice(string),stockstatus(string) - Description: “Look up a product’s customer-facing details by product ID, including its name, description, category, list price, and current stock status.”
get_supplier_cost:
SELECT supplierid, unitcost, marginpercent, suppliercontact FROM catalog.supplier_costs WHERE productid = :productid
- Parameter:
productid(string) - Result fields:
supplierid(string),unitcost(string),marginpercent(string),suppliercontact(string) - Description: “Look up internal supplier cost and margin data for a product by product ID. This is sensitive commercial data; only use it when explicitly asked, and only if you have access to this tool.”
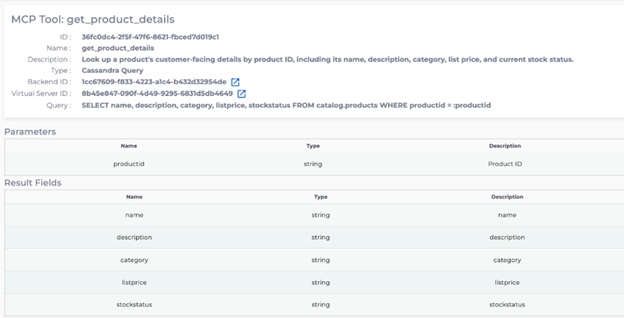
Figure 3. The get_product_details tool definition,
showing its CQL query, productid parameter, and result
fields.
Notes:
- Declare Result Field Type as string for any Cassandra decimal column.
- Give every tool a real, descriptive description. Beyond helping the model choose the right tool, AWS Bedrock’s Converse API expects every tool in the list to have one, so it’s worth treating as a required field alongside the CQL and parameters.
- Apache Cassandra forces unquoted bind variable names to
lowercase:
:productIdis interpreted internally as:productid. That’s why every identifier in this tutorial (table/column names and bind markers alike) is written lowercase from the start, keeping the CQL here consistent with the tool configuration above. If you ever need a case-sensitive parameter name, quote it in the query instead, e.g.:"productId".
4a. Application and Post-Login Action: Follow the Auth0 example configuration guide to:
- Create a Regular Web Application and configure its Allowed Callback URIs / Web Origins.
- Create the Post-Login Action that adds a roles claim when the
mcp_rolesscope is requested, add theMCP_GATEWAY_CLIENT_IDsecret, deploy it, and apply it on the post-login trigger. - Note the audience (API Identifier), issuer, and JWKS URI as described there; needed in Step 5.
4b. Create the three Auth0 Roles: User Management → Roles → Create Role, once each for:
support-agentmerchandiserreadonly-auditor
4c. Create three test users, one per role: User Management → Users → Create User (or reuse existing test users), then on each user’s Roles tab, Assign Roles with the matching role from 4b.
Note: Keep role names consistent,
case-for-case, across three places: the Auth0 Role, the
user_roles claim value it produces, and the MCP
Gateway ACL’s Role name field in Step 6. Matching these exactly is
what makes each persona’s tool list show up correctly.
On the supportchatbot MCP Virtual Server’s OAuth
configuration section (refer to the documentation for
more details), enter the values noted in Step 4a:
- Issuer:
https://<domain>/ - JWKS
URI:
https://<domain>/.well-known/jwks.json - Audience: your API Identifier
- Scopes Supported:
mcp_roles - Roles Claim
Name:
https://mcp_gateway/user_roles
Save/apply.
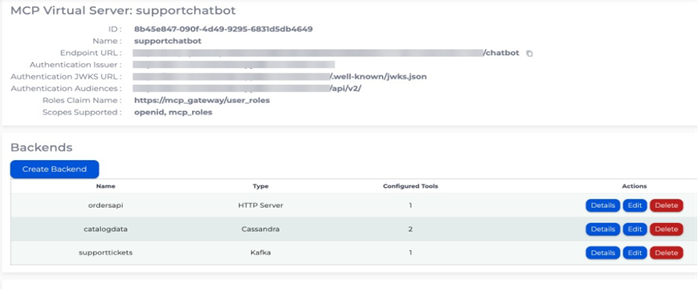
Figure 4. The supportchatbot MCP Virtual Server’s
OAuth configuration with all three backends.
On the MCP Gateway’s ACL screen, you pick each tool by its bare name; the Backend column disambiguates which tool you mean when the same name could theoretically exist on more than one backend:
support-agent
Tool Backendget_orders ordersapi
submit_request supporttickets
get_product_details catalogdata
readonly-auditor
Tool Backendget_orders ordersapi
get_product_details catalogdata
get_supplier_cost catalogdata
merchandiser
Tool Backendget_product_details
catalogdata get_supplier_cost
catalogdata
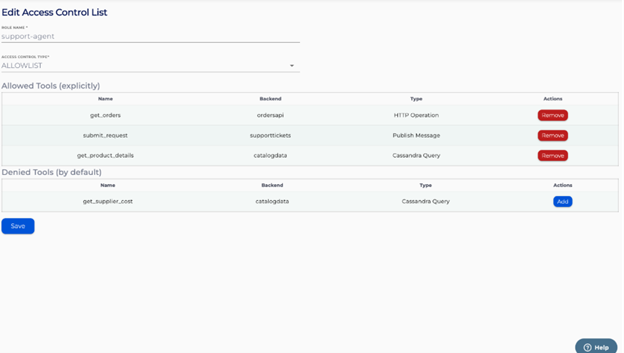
Figure 5. The support-agent Access Control List, showing its explicitly allowed tools.
Each role has a distinct tool set tailored to its purpose: merchandiser focuses entirely on catalog data, while readonly-auditor sees everything the other two combined can see, with action reserved for support-agent.
Once exposed through the supportchatbot MCP Virtual
Server, the agent sees each tool under a backend-prefixed name
(e.g. catalogdata_get_product_details) to disambiguate
tools coming from different backends; that’s the name that shows up
in the app’s “Tools discovered” sidebar later, and in Bedrock’s
tool-calling requests, even though you select it by its bare name
here.
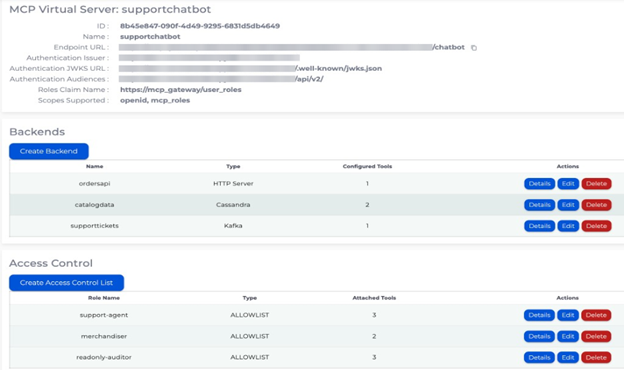
Figure 6. The completed supportchatbot MCP Virtual
Server, showing its OAuth configuration, all three backends, and
the three role-based Access Control Lists.
None of this required touching the chatbot’s code, because it
was built to discover tools dynamically rather than hardcode
them: mcp_manager.py‘s
connect() attaches the user’s access token as a Bearer
header once, at connection time, and every session it opens rides
on that same authenticated connection for the rest of the login;
get_tool_specs() then simply asks the MCP Gateway
which tools this identity can see and turns whatever comes back
into Bedrock’s toolConfig.tools format, with the MCP
Gateway itself deciding (via the caller’s role and its Access
Control List) which tools are included; and app.py‘s
sidebar just renders that same list, grouping tool names by server
with nothing hardcoded. So, when catalogdata‘s two
tools were added at the MCP Gateway, they simply started showing up
for the roles allowed to see them, with zero code changes anywhere
in this repo.
The full code for this tutorial is available at MCP-Gateway/shoe-store-support-chatbot-rbac in
the instaclustr/code-samples repo.
cp config.example.json config.json # fill in your Auth0 tenant + MCP Gateway URL uv sync export AWS_ACCESS_KEY_ID="..." export AWS_SECRET_ACCESS_KEY="..." export AWS_DEFAULT_REGION="us-east-1" uv run streamlit run src/rbac_shoe_bot/app.py
This opens the app at http://localhost:8501.
Compared to the shared-access version from the previous tutorial,
config.json now includes a populated auth0 section,
and the app opens on a Log in with
Auth0 screen.
Click Log in with Auth0 and sign in as one of your test users. To try a different persona, click Log out and log in again; each login prompts for credentials fresh, so you can move between test users freely.
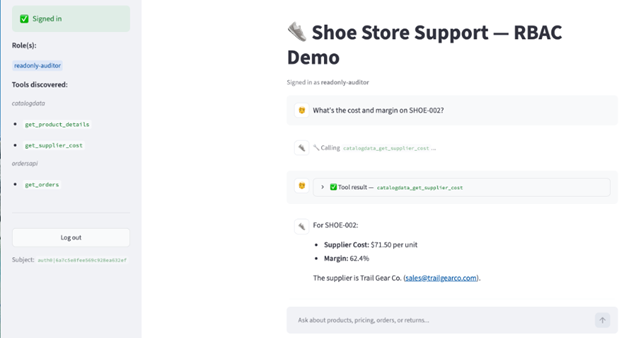
Figure 7. A readonly-auditor session in the
chatbot, showing its discovered tools in the sidebar and a
successful get_supplier_cost lookup for
SHOE-002.
Notes:
- Enable model access for
bedrock.model_idin the Bedrock console for your region ahead of time; it’s a quick, one-time opt-in per model/region, and worth doing before your first run. - The sidebar’s Tools discovered list is the fastest way to
confirm your ACL setup is working as intended; a
merchandisersession should show only the twocatalogdata_*tools.
Demo script
Using the two seeded products:
support-agent: “What’s the price and stock status of product SHOE-001?” → succeeds. “What do we pay our supplier for it?” → no tool available for this role.merchandiser: “What’s our cost and margin on SHOE-001?” → succeeds. “Show me my recent orders.” → no tool available for this role.readonly-auditor: sees both cost and orders, with ticket filing reserved forsupport-agent.
Note: These prompts reference product IDs
directly rather than descriptions like “black shoes,” since
get_product_details looks up by exact
productid. Referencing known IDs keeps the demo
focused on RBAC rather than search.
Authentication, three distinct roles, and a whole new backend technology were all added here through configuration: Auth0 setup, MCP Gateway OAuth config, ACLs, and the Cassandra backend/tools, without changing the chatbot’s own code. That’s the strength of centralizing access control at the MCP Gateway layer: the same access rules apply consistently, however a conversation unfolds, because the boundary lives outside the agent’s own reasoning.
Try it yourselfIf you want to add role-based access control to your own AI agent, you can spin up MCP Gateway and an Apache Cassandra cluster today: start a free Instaclustr trial, no credit card required. From there:
- Follow the MCP Gateway documentation to provision a Virtual Server and connect your first backend.
- Use the Auth0 example configuration guide to wire up your own identity provider.
- Clone MCP-Gateway/shoe-store-support-chatbot-rbac and swap in your own tools, roles, and backends: the same three steps (Auth0 roles claim, Gateway OAuth config, per-role ACLs) apply no matter what your agent actually does.
If you’d rather start from the simpler, single-role version, the previous tutorial walks through connecting an agent to Kafka and HTTP backends without the auth layer.
The post MCP Gateway RBAC tutorial: Add Role-Based Access Control to your AI agent with Auth0 and Apache Cassandra appeared first on Instaclustr.
Vector Search in Apache Cassandra for RAG Retrieval
Semantic retrieval using one Cassandra table to understand how it works, where it shines, and what to watch for.
Vector search in Apache Cassandra ® lets teams store embeddings, index them with Storage-Attached Indexing, and run approximate nearest neighbor queries directly in CQL without managing a separate vector database. For RAG retrieval, that means Cassandra can act as both the operational database and the semantic search layer when the retrieval problem is primarily meaning-based.
Search used to require the person asking to already know the answer’s vocabulary. A technician precisely asks, “Recall 24V-113: tailgate latch”; a truck owner asks, “Is there a recall on the tailgate?” Embeddings close that gap by mapping meaning into geometry, so similar ideas land near each other in vector space regardless of the words used. That geometry is the retrieval layer underneath most AI applications. Using retrieval-augmented generation (RAG), a pattern for answering questions from supplied data instead of the model training set alone, the chatbot can be instructed to only answer from the documents vector search hands it. As a result, the retrieval quality sets the ceiling on the answer.
The standard approach utilizes a dedicated vector store alongside the operational database. While Cassandra is not the first operational database to keep embeddings next to the data they describe, version 5.0 made it a native part of the data model. When the use case fits, querying embeddings on the same infrastructure that houses the data can cut both complexity and cost: one database to operate instead of two, and no application code responsible for keeping them in sync.
This is Part 1 of 2. Part 1 demonstrates semantic retrieval against a realistic knowledge base containing vehicle recalls, tow ratings, and warranty terms using Cassandra. Then, we show where Approximate Nearest Neighbor (ANN) alone is not the complete answer, which sets up a different approach, hybrid RAG, in Part 2.
What is vector search on Apache Cassandra?Vector search on Apache Cassandra lets you store, index, and
query high-dimensional embeddings natively in the database using
the vector<float, N> column type and
Storage-Attached Indexing. Introduced in Cassandra 5.0, it
enables ANN search through an ORDER BY … ANN
OF clause in CQL, with no separate vector store.
At write time, title + body is embedded and stored in a vector
column on the same row as the text. At query time the question is
embedded with that same model, and Cassandra is asked for the
nearest stored vectors. Three pieces of CQL do the whole job:
declare the column, attach an SAI index so ANN is possible, and
query with ORDER BY … ANN OF plus an optional
similarity score in the select list.
CREATE TABLE docs ( id text PRIMARY KEY, title text, body text, category text, model text, model_year int, embedding vector<float, 384> ); CREATE INDEX ON docs (embedding) USING 'sai' WITH OPTIONS = {'similarity_function': 'COSINE'}; SELECT id, title, category, model, model_year, similarity_cosine(embedding, ?) AS score FROM docs ORDER BY embedding ANN OF ? LIMIT 5;
Each piece of that, in turn:
vector<float, N>is a native CQL column type holding an embedding of N dimensions, sitting on the row it describes rather than in another system. It’s 384 here becauseall-MiniLM-L6-v2(which is used for the demo application) produces 384-dimensional vectors; document and query vectors must always use the same model and dimension.- SAI (Storage-Attached Indexing) attaches a searchable index to the table as rows are written. For vector columns it plugs in JVector, an ANN engine that walks a graph of nearby embeddings for fast top-k retrieval.
-
similarity_functionacceptsCOSINE(the default),DOT_PRODUCT, orEUCLIDEAN. Changing it later means dropping and recreating the index. ORDER BYembeddingANN OF ?returns approximate nearest neighbors ordered by similarity. This is fast, but not a guarantee of the true global nearest neighbor.similarity_cosine(embedding, ?)is optional and exists to make the ranking legible. It returns a 0-to-1 value rather than raw cosine, so 0.5 means a document unrelated and a score of 0.75 is not “three-quarters relevant.”
Writes don’t need special handling because the embedding binds
as one more parameter on an ordinary
prepared INSERT alongside the document, and
SAI indexes it as the row is written, under the replication factor
and consistency level you already use. In addition, vectors impose
no special replication requirements. The demo application’s
keyspace is SimpleStrategy with RF 1 only because it’s a
single-node Docker cluster.
Throughout this series, you own a fictional 2024 Summit 1500 and you’re asking a support bot a question. The knowledge base is fictional but realistic: 21 documents covering 12 recalls, tow ratings, payload figures, maintenance intervals, and warranty terms for Summit 1500 and 2500 pickups.
The recall documents matter more than their count suggests. They share one sentence skeleton, mimicking how a real recall notice would read, making them a clean test of something specific: whether an embedding can resolve an identifier when the surrounding prose is nearly identical.
Everything in this series runs on Apache Cassandra 5.0.9 in
Docker, with embeddings generated locally from the all-MiniLM-L6-v2, an
embedding model, so there’s no API key to supply.
Companion app: cassandra-vector-demo.
Follow the instructions in the README to reproduce the output
below. Running the application isn’t required to understand the
concepts in this series.
Throughout this demo, you never directly query Cassandra. Rather, you’ve asked a question, expect an answer back, and never see the retrieved document’s similarity scores. Vector search is the middle step that chooses which rows the language model is allowed to read:
- The application takes the question as text.
- The same embedding model used at insert time turns that question into a vector.
- Cassandra returns a small list of nearest documents
(
ORDER BYembeddingANN OF … LIMIT k). - The application copies those titles and bodies into a prompt, next to the original question. That block is the context.
- The language model writes an answer using (in a well-behaved RAG setup) only that context. It doesn’t scan the knowledge base, only the handful of chunks retrieval picked.
We run three Summit owner questions against the table above and
read what Cassandra ranks. The demo doesn’t call an LLM after
retrieving the results; the point is whether they are trustworthy
before an LLM ever sees it. The first question is a paraphrase,
which is what embeddings exist to solve. The other two are the
limits you plan around: an exact identifier, and a question too
vague to have one answer. Both are properties of similarity search
rather than of Cassandra; the same model against Pinecone,
pgvector, or OpenSearch kNN should produce the same or similar
ordering and both are fixed with a query change rather than a
database change. The output below is generated
from src/demo.py against Cassandra 5.0.9
with all 21 documents seeded.
“Is there a recall on the tailgate?”
python src/demo.py "Is there a recall on the tailgate?"QUERY: Is there a recall on the tailgate? 1. [recalls] recall-24v-113 [1500 2024] Recall 24V-113 tailgate latch score=0.7767 2. [recalls] recall-23v-011 [1500 2023] Recall 23V-011 instrument cluster score=0.7032 3. [recalls] recall-23v-088 [1500 2023] Recall 23V-088 backup camera score=0.6935 4. [recalls] recall-23v-145 [2500 2023] Recall 23V-145 brake booster score=0.6934 5. [recalls] recall-22v-078 [2500 2022] Recall 22V-078 trailer brake module score=0.6808
Vector search ranks Recall 24V-113 (tailgate latch) first, and the margin is wide: 0.7767 against 0.7032 for the runner-up. Nobody wrote the word “tailgate” into the question expecting a latch recall, and the model bridged it anyway, against 11 other recall documents written in nearly identical prose. Everyday paraphrase is exactly what embeddings are for, and one CQL query against one table is the whole implementation.
Outcome 2: An exact recall ID lands nowhere near the top“What is recall 24V-330?”
Now you have the recall number.
python src/demo.py "What is recall 24V-330?" QUERY: What is recall 24V-330? 1. [recalls] recall-23v-011 [1500 2023] Recall 23V-011 instrument cluster score=0.7871 2. [recalls] recall-24v-207 [1500 2024] Recall 24V-207 fuel pump relay score=0.7701 3. [recalls] recall-23v-088 [1500 2023] Recall 23V-088 backup camera score=0.7623 4. [recalls] recall-24v-113 [1500 2024] Recall 24V-113 tailgate latch score=0.7560 5. [recalls] recall-24v-155 [2500 2024] Recall 24V-155 glow plug controller score=0.7514
The document for 24V-330 sits at rank 9, scoring 0.7332, below eight notices that never mention it. The recall notices share one sentence skeleton, so the ID is a handful of characters inside an otherwise near-identical embedding, and ANN ranks by overall closeness. Cosine distance has no notion of an exact token match, which is why the same model produces this ranking in any vector store, and why the fix is a lexical path beside ANN rather than a better embedding model. Part 2 of the series works to address this limitation.
Outcome 3: A question retrieval cannot answer as asked“How much can the Summit 1500 tow?”
python src/demo.py "How much can the Summit 1500 tow?" QUERY: How much can the Summit 1500 tow? 1. [towing] summit-1500-2024-tow [1500 2024] Tow ratings by configuration, 2024 model year score=0.8990 2. [towing] summit-1500-2023-tow [1500 2023] Tow ratings by configuration, 2023 model year score=0.8853 3. [towing] summit-2500-2024-tow [2500 2024] 2024 Summit 2500 heavy duty towing capacity score=0.8791 4. [specs] summit-1500-2024-payload [1500 2024] 2024 Summit 1500 payload capacity score=0.8276 5. [towing] hitch-classes Hitch receiver classes and weight distribution score=0.7550
The ranking looks reasonable until you read the bodies. The top four sit within 0.08 of each other and answer four different questions: 11,300 lb for the 2024 1500, 9,100 lb for the 2023 1500, 17,600 lb for the 2500, and 1,750 lb of payload, which isn’t a tow rating at all.
Retrieval did its job since all four are genuinely relevant to
what was asked. The question just never supplied a model year, so
nothing in the index can pick a winner. The fix is
a WHERE model_year = ? alongside ANN, which
is exactly why those columns are on the table, and will be utilized
in Part 2.
Vector search is enough when the question is about meaning
and an incorrect response is recoverable: everyday
paraphrase like “is there a recall on the tailgate,” similar
tickets, or similar products already sitting in Cassandra. It isn’t
enough when an identifier, a model year, or a customer record has
to be exact, and no similarity threshold will separate those two
cases for you. Those need a lexical path or
a WHERE clause next to ANN, which is the
work of Part 2 using additional SAI indexes on this same table, so
the fix stays inside Cassandra rather than adding the second system
you just avoided.
Neither of those statements is specific to Cassandra. They describe ANN retrieval wherever it runs, and teams building RAG on a dedicated vector store can reach the same two conclusions and apply the same two fixes. What Cassandra changes is the operational surface rather than the ranking: a column and an index on a table you already replicate, back up, and secure.
Native doesn’t mean equivalent. A dedicated search platform still wins on lexical ranking and relevance tuning, but it changes the starting assumption and depending on the use case, a second system doesn’t need to be a default to accept.
Apache Cassandra vector search version and operational notesVector search on Cassandra is continuing to mature, so treat patch releases as part of planning.
- Prefer 5.0.7 or later. Earlier
5.0 patches could return stale neighbors after overwrites and
tombstones, and
WHEREplus ANN queries were prone to timeouts. CASSANDRA-20086 reworked that path in 5.0.7 and 6.0. This project uses 5.0.9. Note that Instaclustr does not support 5.0.7 nor 5.0.8. - Cassandra 6.0 isn’t GA yet. Alpha1 arrived in March 2026, alpha2 in August. The work since 5.0 has been correctness rather than new capability, so nothing above changes.
- Cassandra 5.0.6 is Generally Available on the NetApp Instaclustr Managed Platform. This works for the demo, which is read-only against a freshly seeded table. Track the platform version list before putting vector writes into production.
Run the three questions against a live Cassandra 5 table on Docker. The demo application is from cassandra-vector-demo. Clone it, follow the README, and compare your rankings to the output in this series.
The same CQL runs on Instaclustr for Apache Cassandra 5.0. A new cluster takes a few clicks in the console; start a free trial and point the demo at the managed contact point instead of 127.0.0.1. You write the table; NetApp manages the cluster.
Further reading on native vectors: Apache Cassandra 5.0 vector search, similarity search with the vector type.
Part 2 of this series continues with the same Summit table and uses hybrid RAG to improve correctness.
The post Vector Search in Apache Cassandra for RAG Retrieval appeared first on Instaclustr.